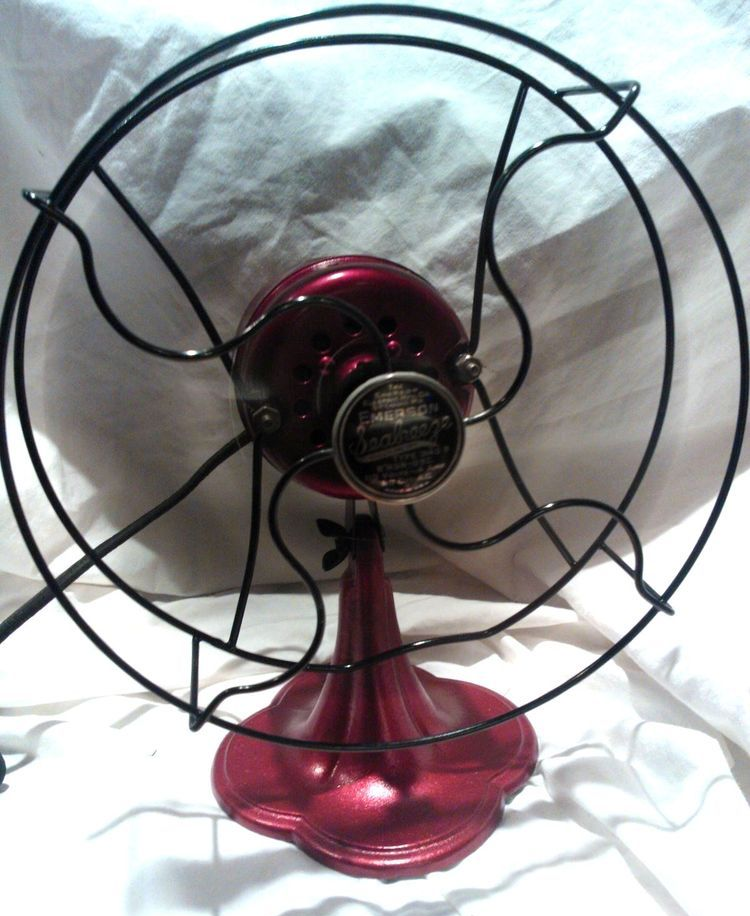
Restoring a vintage Emerson Electric fan can be a rewarding project that not only brings a piece of history back to life but also enhances your home decor. Emerson fans, known for their durability and classic design, are cherished by collectors and enthusiasts alike. This guide will walk you through the steps necessary to restore your vintage Emerson Electric fan, ensuring it operates smoothly and looks stunning. By following these detailed instructions, you can appreciate the craftsmanship of these fans while enjoying their functionality.
Table of Contents
Understanding Your Emerson Electric Fan
Before diving into the restoration process, it’s essential to understand the specific model of your Emerson fan. Emerson Electric has produced various models over the years, each with unique features. Common models include the Emerson 29646, 79646, and 2250, among others. Familiarizing yourself with your fan’s specifications will help you identify the parts you need to restore. Each model may have different blade designs, motor types, and electrical configurations, so knowing your fan’s history can guide your restoration efforts effectively.
Tools and Materials Needed
To successfully restore your vintage Emerson Electric fan, gather the following tools and materials:
– Screwdrivers (flathead and Phillips): Essential for removing screws and disassembling parts.
– Pliers: Useful for gripping and twisting wires or small components.
– Wire cutters: Necessary for cutting old or damaged wires during the restoration.
– Multimeter (for electrical testing): Helps in diagnosing electrical issues by measuring voltage, current, and resistance.
– Replacement parts (capacitors, cords, etc.): Having these on hand can save time and ensure your fan is restored to its original functionality.
– Cleaning supplies (soap, water, cloths): Important for removing dirt and grime from the fan’s surfaces.
– Paint or polish (if needed): To restore the fan’s aesthetic appeal, especially if the finish has worn over time.
– Lubricating oil (for the motor): Ensures smooth operation of the motor and reduces wear and tear.
Having the right tools and materials ready will streamline the restoration process and help you avoid unnecessary delays.
Step-by-Step Restoration Process
Step 1: Disassembly
1. Unplug the Fan: Safety is paramount. Always ensure the fan is unplugged before starting any work. This step is crucial to prevent electrical shocks and ensure a safe working environment.
2. Remove the Grille: Use a screwdriver to detach the front grille. Be careful not to damage the clips or screws, as these can be difficult to replace if lost.
3. Take Out the Blades: Gently remove the blades from the motor shaft. If they are stuck, a little twisting may help. Take note of how they are positioned for easier reassembly.
4. Disassemble the Base: Depending on your model, you may need to remove screws from the base to access the motor. Keep all screws organized to avoid confusion during reassembly.
Disassembling the fan carefully is essential to avoid damaging any components. Documenting the process with photos can also be helpful for reassembly.
Step 2: Cleaning
1. Dust and Debris: Use a soft cloth to wipe down all parts, removing dust and debris. For stubborn grime, a mixture of soap and water can be effective. Pay special attention to the motor and blade areas, as these can accumulate dirt over time.
2. Rust Removal: If you notice any rust, use fine steel wool or a rust remover to clean the affected areas. Be gentle to avoid scratching the metal. If the rust is extensive, consider using a rust-inhibiting primer before repainting.
3. Polishing: For brass or chrome parts, consider using a metal polish to restore their shine. This not only improves the appearance but also protects the metal from future tarnishing.
A thorough cleaning not only enhances the fan’s appearance but also ensures that it operates efficiently. Removing dust and rust can significantly improve airflow and performance.
Step 3: Electrical Inspection
1. Check the Wiring: Inspect all electrical connections for fraying or damage. Use a multimeter to test the continuity of the wires. This step is crucial to ensure the fan operates safely and effectively.
2. Replace Capacitors: If your fan has a capacitor, it’s wise to replace it, even if it appears functional. Capacitors can degrade over time, affecting performance. Ensure you use a capacitor that matches the specifications of your fan model.
3. Rewire if Necessary: If the wiring is damaged, carefully rewire the fan using appropriate gauge wire. This is a critical step to prevent electrical hazards and ensure reliable operation.
Conducting a thorough electrical inspection can prevent future issues and ensure that your restored fan operates as intended.
Step 4: Reassembly
1. Reattach the Motor: Secure the motor back into the base, ensuring all screws are tight. Double-check that all connections are secure and properly insulated.
2. Install the Blades: Carefully place the blades back onto the motor shaft, ensuring they are aligned correctly. Misalignment can lead to vibrations and noise during operation.
3. Reattach the Grille: Secure the front grille back onto the fan, making sure it is firmly in place. This not only protects the internal components but also enhances the fan’s aesthetic appeal.
Reassembling the fan correctly is just as important as disassembling it. Taking your time during this step can prevent operational issues later on.
Step 5: Final Touches
1. Lubricate the Motor: Apply a few drops of lubricating oil to the motor bearings to ensure smooth operation. This step is vital for reducing friction and prolonging the life of the motor.
2. Test the Fan: Plug in the fan and test all speeds to ensure it operates correctly. Listen for any unusual noises that may indicate further issues. If the fan does not operate as expected, revisit the electrical connections and motor assembly.
Final touches can make a significant difference in the performance and longevity of your restored Emerson fan. A well-lubricated motor and thorough testing will ensure that your fan runs smoothly.
Tips for a Successful Restoration
– Take Photos: Document each step of the disassembly process with photos. This will help you remember how to reassemble the fan. It can also serve as a reference for future restorations.
– Be Patient: Restoration can be time-consuming. Take your time to ensure each step is done correctly. Rushing through the process can lead to mistakes and potential damage.
– Seek Help: If you encounter difficulties, consider reaching out to online forums or local fan restoration groups for advice. Many enthusiasts are willing to share their knowledge and tips.
Patience and attention to detail are key to a successful restoration. Engaging with the community can also provide valuable insights and support.
Common Issues and Solutions
Issue 1: Fan Won’t Start
Solution: Check the power cord for damage and ensure the switch is functioning. Test the capacitor and replace it if necessary. If the fan still doesn’t start, inspect the motor for any signs of failure.
Issue 2: Noisy Operation
Solution: Noises can indicate a need for lubrication or misalignment of the blades. Ensure the blades are properly secured and lubricate the motor. If the noise persists, check for loose screws or damaged bearings.
Issue 3: Rust on Blades
Solution: Use a rust remover and polish to clean the blades. Consider repainting if the rust is extensive. Applying a protective coating can help prevent future rusting.
Issue 4: Weak Airflow
Solution: Ensure the blades are clean and free of obstructions. Check the motor to ensure it is running at full speed. If airflow remains weak, inspect the fan’s housing for any blockages.
Issue 5: Electrical Issues
Solution: Inspect all wiring and connections. Replace any damaged components and ensure all connections are secure. If you’re unsure about electrical repairs, consult a professional.
Addressing these common issues promptly can enhance the performance and longevity of your vintage Emerson Electric fan.
Conclusion
Restoring a vintage Emerson Electric fan is not only a fulfilling project but also a way to preserve a piece of history. By following these steps and tips, you can bring your fan back to life, ensuring it continues to provide comfort and style for years to come. Whether you’re a seasoned restorer or a beginner, the satisfaction of seeing your Emerson fan in working order is well worth the effort. Embrace the journey of restoration, and enjoy the beauty and functionality of your vintage fan.
How to purchase:https://looperbuy.com/search?keywords=emerson+electric+fan
Frequently Asked Questions
1. What is the best way to clean my Emerson fan?
– Use a soft cloth and a mild soap solution. For rust, fine steel wool or rust remover can be effective. Always dry the parts thoroughly to prevent moisture damage.
2. How often should I lubricate my fan?
– It’s recommended to lubricate the motor every few years or whenever you notice increased noise or resistance. Regular maintenance can extend the life of your fan.
3. Can I replace the fan blades?
– Yes, replacement blades are available, but ensure they are compatible with your specific Emerson model. Using the correct blades is crucial for optimal performance.
4. What should I do if my fan has electrical issues?
– Inspect the wiring and connections. If you’re unsure, consult a professional or an experienced restorer. Electrical issues can be complex and may require expert assistance.
5. Is it worth restoring an old Emerson fan?
– Absolutely! Vintage Emerson fans are durable and can be restored to their original beauty, making them valuable collectibles. The restoration process can also be a rewarding hobby.