Traveling is one of life’s greatest joys, allowing us to explore new places, meet new people, and create lasting memories. One of the best ways to document these adventures is through a travel journal. In this guide, we will explore how to create a unique map matchbook notebook, a compact and stylish way to keep track of your travels. This DIY project not only serves as a functional journal but also as a beautiful keepsake that reflects your journey. By the end of this article, you will have all the knowledge you need to craft your own personalized travel journal that captures the essence of your adventures.
Table of Contents
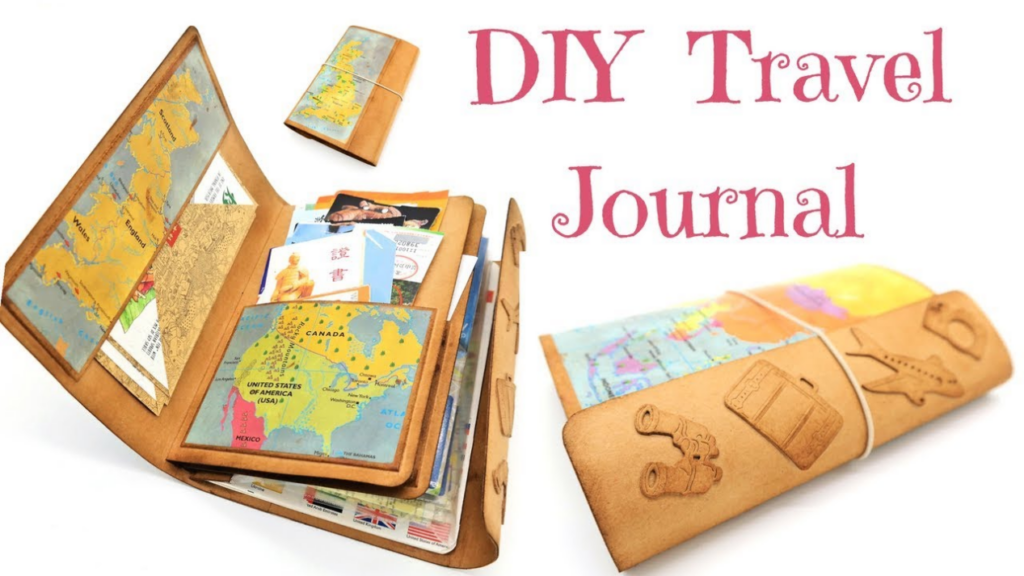
What is a Map Matchbook Notebook?
A map matchbook notebook is a creative travel journal that combines the aesthetics of maps with the practicality of a matchbook-style notebook. This type of notebook is compact, making it easy to carry around while traveling. It typically features a cover made from maps or map-themed paper, and the pages inside can be used for notes, sketches, and mementos from your travels. The design mimics the classic matchbook, which is not only nostalgic but also functional, allowing you to easily flip through your entries. This unique format encourages you to be creative with your journaling, as you can incorporate various elements from your travels, such as ticket stubs, pressed flowers, or even small photographs.
Why Create a Map Matchbook Notebook?
Creating a map matchbook notebook has several benefits:
1. Personalization: You can customize it to reflect your style and the places you visit. This personal touch makes your journal a true representation of your journey, allowing you to express your individuality through colors, designs, and content.
2. Compact Size: Its small size makes it easy to fit into a bag or pocket. This portability ensures that you can take it with you wherever you go, making it convenient to jot down thoughts or sketches on the spot.
3. Creative Expression: It allows you to express your creativity through design and content. You can experiment with different layouts, colors, and embellishments, turning your journal into a work of art that showcases your travels.
4. Memorable Keepsake: It serves as a tangible reminder of your adventures. Unlike digital records, a physical journal allows you to relive your experiences through the act of writing and creating, making it a cherished keepsake for years to come.
Materials Needed
Before you start crafting your map matchbook notebook, gather the following materials:
– Maps: Old maps or printed map designs. You can use maps from places you’ve visited or ones that inspire future travels, adding a layer of meaning to your journal.
– Cardstock or Thick Paper: For the cover and pages. Choose colors or textures that resonate with your travel aesthetic, whether it’s rustic, modern, or whimsical.
– Scissors: For cutting the materials. A good pair of scissors will ensure clean edges, which is important for a polished final product.
– Glue or Double-Sided Tape: For assembling the notebook. Make sure to use a strong adhesive to ensure that your pages stay securely attached.
– Ruler: For measuring and ensuring straight cuts. Precision is key in crafting, so a ruler will help you achieve neat and uniform dimensions.
– Pencil: For marking measurements. A pencil allows you to make adjustments easily before making any permanent cuts.
– Decorative Items: Stickers, washi tape, or stamps for embellishing. These items can add personality and flair to your journal, making it uniquely yours.
Step-by-Step Guide to Creating Your Map Matchbook Notebook
Step 1: Prepare the Cover
1. Choose Your Map: Select a map that resonates with you. It could be a map of a specific city, country, or even a vintage map. Consider the colors and designs of the map, as they will set the tone for your entire notebook.
2. Cut the Cover: Using your ruler and pencil, measure and cut a piece of cardstock to the desired size of your notebook cover. A common size is 4 inches by 6 inches, but feel free to adjust based on your preferences.
3. Attach the Map: Cut the map to the same size as the cardstock cover. Use glue or double-sided tape to attach the map to the cardstock, ensuring it is smooth and free of bubbles. This step is crucial, as a well-attached cover will enhance the durability and appearance of your notebook.
Step 2: Create the Pages
1. Cut the Pages: Cut several sheets of thick paper or cardstock to the same size as your cover. You can use plain paper, lined paper, or even decorative paper. Mixing different types of paper can add visual interest to your journal.
2. Stack the Pages: Align the pages neatly and fold them in half. This will create the spine of your notebook. Make sure the edges are aligned for a clean finish.
Step 3: Assemble the Notebook
1. Bind the Pages: Place the folded pages inside the cover. Use a stapler or a hole punch with string to bind the pages to the cover. If using a hole punch, make sure to punch holes along the spine and thread the string through to secure the pages. This binding method not only holds the pages together but also adds a decorative element to your notebook.
2. Trim Excess: If necessary, trim any excess paper that extends beyond the cover. This will give your notebook a neat and professional look.
Step 4: Add Personal Touches
1. Decorate the Cover: Use stickers, washi tape, or stamps to personalize the cover. You can also write your name or a travel quote on the front. This is your opportunity to make the notebook truly yours, reflecting your personality and travel style.
2. Create Sections: Consider dividing the pages into sections for different aspects of your travels, such as itineraries, daily reflections, or sketches. You can use tabs or colored paper to differentiate these sections, making it easier to navigate your journal.
Step 5: Start Journaling
Now that your map matchbook notebook is complete, it’s time to start documenting your travels! Here are some ideas on what to include:
– Daily Reflections: Write about your experiences, thoughts, and feelings each day. This practice not only helps you remember your adventures but also allows for personal growth and reflection.
– Sketches: Draw scenes from your travels or interesting things you see. Sketching can be a therapeutic way to capture the essence of a place, and it adds a personal touch to your journal.
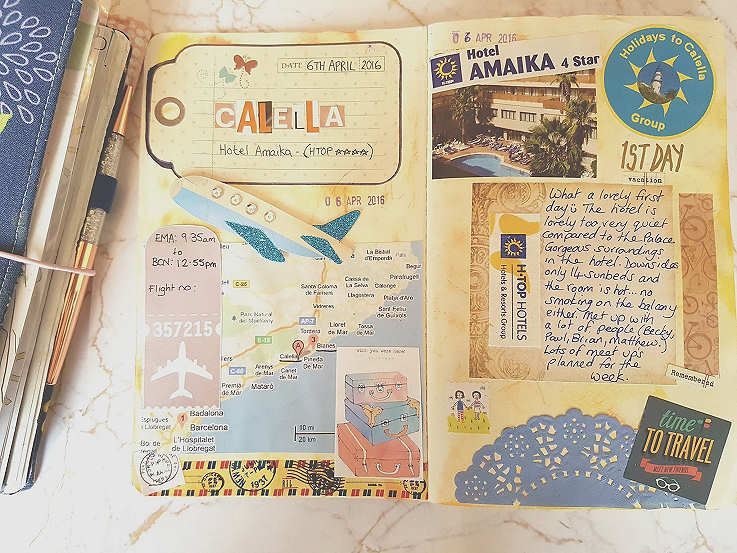
– Mementos: Glue in tickets, postcards, or other small items that remind you of your journey. These tangible items can evoke memories and emotions, making your journal a rich tapestry of your experiences.
– Maps: Include small maps of places you visit, highlighting your favorite spots. This can serve as a visual representation of your travels and help you remember the routes you took.
Tips for Using Your Map Matchbook Notebook
– Carry It Everywhere: Keep your notebook handy to jot down thoughts or sketches whenever inspiration strikes. The more you use it, the more it will become a part of your travel routine.
– Be Creative: Don’t be afraid to experiment with different layouts, colors, and designs. Your journal is a reflection of you, so let your creativity shine through.
– Reflect Often: Take time to read back through your entries and reflect on your experiences. This practice can deepen your appreciation for your travels and help you learn from them.
Conclusion
Creating a map matchbook notebook is a rewarding DIY project that enhances your travel experience. Not only does it provide a space to document your adventures, but it also serves as a creative outlet. By following the steps outlined in this guide, you can craft a personalized travel journal that captures the essence of your journeys. Each entry will become a cherished memory, allowing you to relive your adventures long after they have ended.
How to purchase:https://looperbuy.com/search?keywords=map+matchbook+notebook
Frequently Asked Questions
1. What size should I make my map matchbook notebook?
You can choose any size that suits your needs, but a common size is 4 inches by 6 inches, which is compact and easy to carry. This size strikes a balance between being large enough to write comfortably and small enough to fit in your pocket or bag.
2. Can I use digital maps for my notebook?
Yes, you can print digital maps from online sources and use them for your cover or pages. This option allows you to customize your notebook with maps of specific locations that hold significance for you.
3. What types of paper are best for the pages?
Thick paper or cardstock works best for durability, but you can also use lined or decorative paper for variety. Consider using different textures and colors to make your journal visually appealing.
4. How can I make my notebook more durable?
Consider using a thicker cardstock for the cover and reinforcing the spine with tape or fabric. Additionally, you can laminate the cover for extra protection against wear and tear.
5. What should I do if I run out of pages?
You can easily add more pages by cutting additional sheets and binding them to the existing notebook. This flexibility allows your journal to grow with your travels, accommodating all your experiences.