Wiring an aftermarket electric fan can seem daunting, but with the right guidance, it can be a straightforward process. This article will explore the essential components, wiring diagrams, and step-by-step instructions to help you successfully install an aftermarket electric fan in your vehicle. Understanding the intricacies of this installation not only enhances your vehicle’s performance but also empowers you with the knowledge to tackle similar projects in the future.
Table of Contents
Understanding Aftermarket Electric Fans
Aftermarket electric fans are popular upgrades for vehicles, especially for those looking to improve cooling efficiency. Unlike traditional mechanical fans, electric fans can be controlled more precisely, allowing for better engine temperature management. They can also reduce engine load, which can lead to improved fuel efficiency. This is particularly beneficial in high-performance or modified vehicles where maintaining optimal engine temperatures is crucial for performance and longevity.
Benefits of Aftermarket Electric Fans
Aftermarket electric fans offer several advantages over stock fans. They are generally lighter, can be mounted in various positions, and can be activated based on temperature, which helps maintain optimal engine performance. Additionally, they can be quieter than mechanical fans, providing a more pleasant driving experience. The ability to customize the fan’s operation based on specific driving conditions or modifications can lead to significant improvements in both performance and comfort.
Key Components of an Aftermarket Electric Fan Wiring Diagram
Before diving into the wiring process, it’s essential to understand the components involved in an aftermarket electric fan setup. Each component plays a vital role in ensuring the fan operates efficiently and effectively.
Electric Fan
The electric fan itself is the primary component. It comes in various sizes and styles, so it’s crucial to choose one that fits your vehicle’s specifications. When selecting an electric fan, consider factors such as airflow rating, size, and mounting options. A fan with a higher airflow rating can provide better cooling, especially in high-performance applications where engine temperatures can rise quickly.
Relay
A relay is an electrical switch that allows a low-power signal to control a high-power circuit. Using a relay in your fan wiring setup is essential to prevent damage to your vehicle’s electrical system. The relay acts as a bridge between the fan and the vehicle’s battery, ensuring that the fan receives adequate power without overloading the system. This is particularly important in modern vehicles with sensitive electronic systems.
Temperature Switch
The temperature switch is a critical component that activates the fan when the engine reaches a certain temperature. This ensures that the fan operates only when necessary, helping to conserve energy. By using a temperature switch, you can prevent the fan from running continuously, which can lead to unnecessary wear and tear on the fan motor and increased energy consumption.
Fuse
A fuse protects the electrical circuit from overload. It’s vital to include a fuse in your wiring setup to prevent potential damage to the fan and the vehicle’s electrical system. The fuse acts as a safety mechanism, breaking the circuit if the current exceeds a certain level, thus protecting the wiring and components from overheating and potential failure.
Wiring Harness
A wiring harness simplifies the installation process by providing pre-terminated wires that connect the various components of the fan system. Using a wiring harness can save time and reduce the risk of errors during installation. It also helps to keep the wiring organized, which is essential for troubleshooting and maintenance in the future.
Wiring Diagram Overview
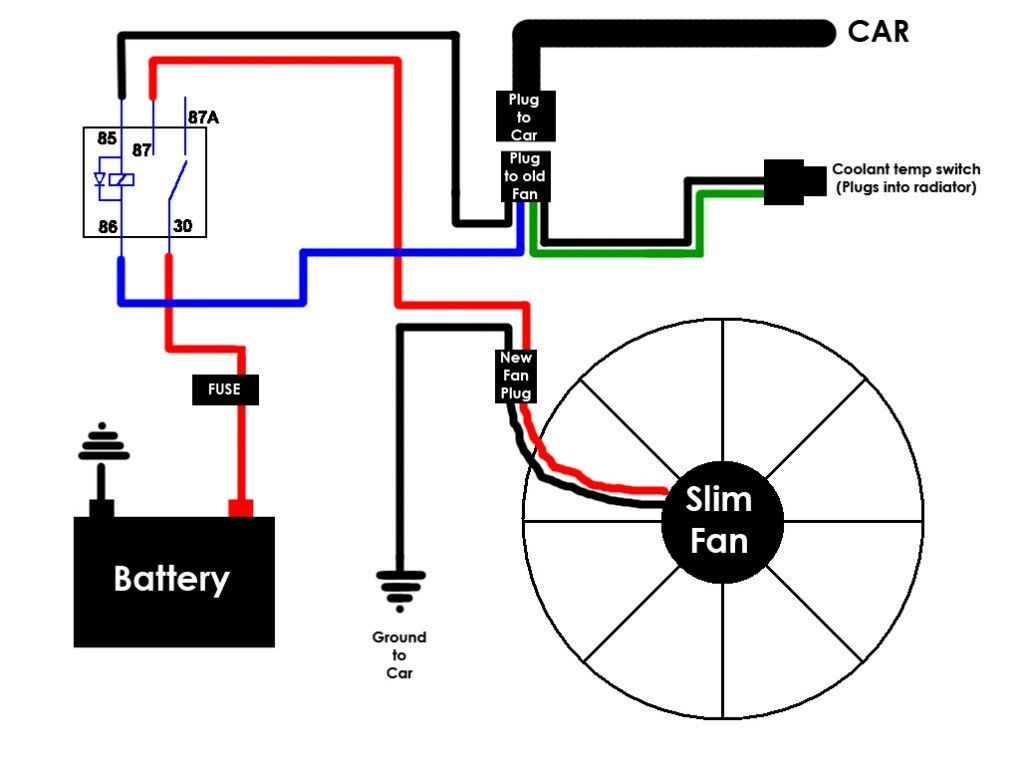
A wiring diagram is a visual representation of the electrical connections in your aftermarket electric fan setup. It typically includes the fan, relay, temperature switch, fuse, and battery connections. Understanding this diagram is crucial for a successful installation, as it provides a clear roadmap for connecting each component correctly.
Basic Wiring Diagram Components
In a typical wiring diagram for an aftermarket electric fan, you will find:
– Battery Connection: The positive terminal of the battery connects to the relay and the fan. This connection is crucial as it provides the necessary power for the fan to operate.
– Ground Connection: The fan and relay must be grounded to the vehicle’s chassis. A good ground connection is essential for the fan to function properly and to prevent electrical issues.
– Temperature Switch: This connects to the relay and is responsible for activating the fan based on engine temperature. The switch ensures that the fan only runs when needed, optimizing performance and energy use.
– Fuse: Positioned between the battery and the relay to protect the circuit. The fuse should be rated appropriately for the fan’s current draw to ensure effective protection.
Step-by-Step Wiring Instructions
Now that you understand the components and the wiring diagram, let’s go through the step-by-step process of wiring an aftermarket electric fan. Following these steps carefully will help ensure a successful installation.
Step 1: Gather Your Tools and Materials
Before starting, ensure you have all the necessary tools and materials. You will need:
– Aftermarket electric fan
– Relay
– Temperature switch
– Fuse
– Wiring harness
– Wire connectors
– Electrical tape
– Basic hand tools (screwdrivers, pliers, etc.)
Having all the tools and materials ready will streamline the installation process and minimize interruptions.
Step 2: Disconnect the Battery
Safety is paramount when working with electrical systems. Begin by disconnecting the negative terminal of the battery to prevent any accidental short circuits. This step is crucial to avoid any electrical shocks or damage to the vehicle’s electrical system during installation.
Step 3: Mount the Electric Fan
Position the electric fan in front of the radiator, ensuring it fits securely. Most fans come with mounting brackets that allow for easy installation. Proper positioning is essential for optimal airflow and cooling efficiency. Make sure the fan is mounted securely to prevent vibrations that could lead to wear over time.
Step 4: Connect the Wiring Harness
Using the wiring harness, connect the fan to the relay. The harness will typically have color-coded wires that correspond to the fan, relay, and temperature switch. Follow the wiring diagram to ensure correct connections. Double-check each connection to ensure they are secure and correctly aligned to avoid any electrical issues.
Step 5: Install the Temperature Switch
The temperature switch should be installed in the engine block or radiator, depending on your vehicle’s design. This switch will monitor the engine temperature and activate the fan when necessary. Proper placement of the temperature switch is critical for accurate temperature readings and effective fan operation.
Step 6: Connect the Relay
Connect the relay to the battery, fan, and temperature switch according to the wiring diagram. Ensure that the relay is securely mounted and that all connections are tight. A loose connection can lead to intermittent fan operation, which can cause overheating.
Step 7: Install the Fuse
Insert the fuse into the designated slot in the wiring harness. This will protect your fan and electrical system from overload. Make sure to use a fuse that is rated for the current draw of the fan to ensure effective protection.
Step 8: Ground the System
Connect the ground wire from the fan and relay to a clean, unpainted metal surface on the vehicle’s chassis. This ensures a proper ground connection, which is essential for the fan to operate correctly. A poor ground connection can lead to erratic fan behavior and potential electrical issues.
Step 9: Reconnect the Battery
Once all connections are made, reconnect the negative terminal of the battery. This step restores power to the electrical system, allowing you to test the fan operation.
Step 10: Test the System
Start your vehicle and allow it to reach operating temperature. Monitor the temperature gauge and ensure that the fan activates when the engine reaches the specified temperature. If everything works correctly, you have successfully wired your aftermarket electric fan. If the fan does not activate, revisit the wiring connections and troubleshoot any issues.
Troubleshooting Common Issues
Even with careful installation, you may encounter issues with your aftermarket electric fan. Here are some common problems and their solutions.
Fan Does Not Turn On
If the fan does not activate, check the following:
– Ensure the temperature switch is functioning correctly. A faulty switch may not send the signal to activate the fan.
– Verify all connections are secure and correctly wired. Loose or incorrect connections can prevent the fan from receiving power.
– Check the fuse to see if it has blown. A blown fuse will interrupt the power supply to the fan.
Fan Runs Continuously
If the fan runs continuously, it may be due to a faulty temperature switch. Consider replacing the switch to resolve the issue. Continuous operation can lead to unnecessary wear on the fan motor and increased energy consumption.
No Power to the Fan
If there is no power to the fan, check the relay and ensure it is functioning. You can test the relay by bypassing it temporarily to see if the fan activates. If the fan works when bypassed, the relay may need to be replaced.
Conclusion
Wiring an aftermarket electric fan can significantly enhance your vehicle’s cooling efficiency. By understanding the components, following a clear wiring diagram, and adhering to the installation steps, you can successfully complete this project. This upgrade not only improves engine performance but also provides peace of mind knowing that your vehicle is equipped to handle increased demands.
How To Purchase:https://looperbuy.com/search?keywords=aftermarket+electric+fan+wirng+diagram
Related Questions and Answers
1. What tools do I need to install an aftermarket electric fan?
You will need basic hand tools such as screwdrivers, pliers, and wire connectors, along with the fan, relay, temperature switch, and fuse.
2. How do I know if my electric fan is working?
You can test the fan by starting your vehicle and monitoring the temperature gauge. The fan should activate when the engine reaches a certain temperature.
3. Can I use a single relay for dual electric fans?
Yes, you can use a single relay for dual fans, but ensure it is rated for the combined amperage of both fans.
4. What should I do if my fan runs continuously?
If your fan runs continuously, check the temperature switch for faults and consider replacing it if necessary.
5. Is it necessary to use a fuse in the wiring setup?
Yes, using a fuse is crucial as it protects the electrical system from overload and potential damage.